Aug
27
2015

Can't fudge this

The good thing about drawing is that you can blithely say that your character has a 20m wingspan and still draw them folded up neatly against their backs in the pose everyone expects, which is something similar to my short-armed redo which had a roughly 5m wingspan:


Blender Avian model with chicken wings

Aug
22
2015

Contemplating Avian wing sizing...

I can't remember how I came about my original calculations but I worked out that a 1.8m tall (because that's how tall my base model is, no other real reason) Avian should have a 10-12m wingspan.  Because I didn't want to make the wing arms too big (because heavy plus looked stupid past a certain point) I managed to end up with 3m long primaries.

Blender Avian model with 10m wingspan

For comparative purposes one with a 7m wingspan (made the wing arms longer but used the feathers I'd done originally, didn't zoom in for size comparison):

Blender Avian model with 7m wingspan

Aug
19
2015

Avian wing progression

Reasonably weight mapped chicken wings.

Avian Blender model with folded chicken wings

Which I think looks a lot better than the Lightwave model I did five years ago (weight mapping was probably still a work in progress here or at least I hope it was, I can't remember now):

Lightwave Avian model weightmap wip

And now comes with primary, secondary and tertial flight feathers.

Avian Blender model with flight feathers

Aug
13
2015

Rig test 2

Error riddled but I'm calling it done so I can move along with other things.  Like characters and sets and maybe more paintovers.  Least my arm rig works which was the purpose of the exercise!

Jul
01
2015

Insanorig

Unprofessional Blender rig

My completely unprofessional rig which is probably unusable by anyone else but does the job for me.  It's off-centre from the base (which everything is eventually parented to) because I did some ground stuff directly beforehand.  The arms are a bit awkward to position at times as I'm using the targets to control the rotation for the elbows as I can't seem to get pole targets working on arms for some reason (no problems on legs but legs are just easier).  I'll give it another shot before committing to the rig enough to transfer it to the other two models.

Jun
29
2015

Seriously? Again?

Posed character in Blender

Screencap of Base after mouthing "Seriously again?" (it doesn't have a voice).  I'm trying to work out how to tackle doing bone drivers for the 10 phoneme key shapes I have.  They'll easily fit on the three mouth controllers that I have seeing as I only use one direction for anything but knowing my luck I'll have a hell of a time remembering what's what.

Still it may have to happen seeing as bone keys are a lot easier to move than shape key keys (I actually can't seem to move shape key keys at all for some reason).

This is a screenie, Base is actually looking directly at the camera so will be rendered more front on.

Jun
28
2015

Blender notes: bone drivers for shape keys

Set up controller bones (I like them in their own Armature) and make sure the "deform" box in the bone properties panel is unchecked.

Setting up face controller rig for bone drivers in Blender 2.74

I find it easier having the entire face moving around with the eye directional controller because I'm weird like that (and also they end up in odd places because of how I have the head controller).

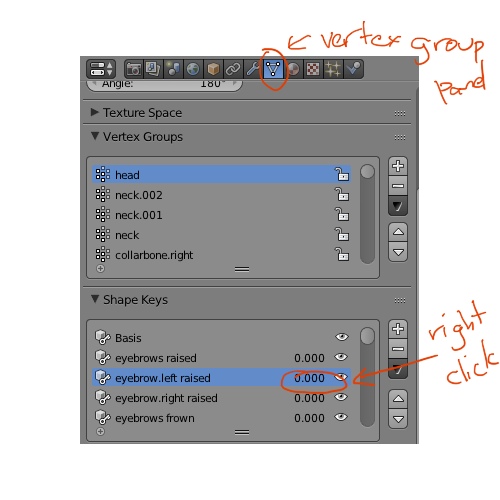
On the mesh where the shape keys are, right click on the shape key that needs to be driven by the bone.  In this example the eyebrow raise.

Setting up bone drivers in Blender 2.74

Click "Add Driver" on the context menu that pops up.

Jun
08
2015

Blender notes: extremely basic hair

When I did the head hair I did a scalp (copy of the...uh...scalp on the top of the head where the hair is growing out of shrunk down to fit just inside the head) with its own material to colour the hair strands because it was the easiest thing to do as the hair strands pick up whatever texture is applied to the geometry.  Wasn't too crazy about the extra geometry but couldn't work out how everyone else on the planet had done it so crashed around the particle system and node tree til I got something going.

Add the hair in the usual fashion:

Blender notes initial hair setup

Jun
05
2015

3d-fyn hair progression

I have no idea what I'm doing (despite reading the internet).

I had to redo the hair emitters about a million times because I kept blowing something up (and not knowing what I blew up, but combing strands in Particle Mode is kind of amusing for a while).  When I finally got that sorted my first test looked like a polyp colony.

Blender hair polyp colony

When I eventually got something I liked I couldn't work out how to get the red (which is actually supposed to be bleached but I just grabbed a random high constrasting colour at the time) to just be on the mohawk (probably needed a uv map) and then the fuzz on the side was playing silly buggers.

May
29
2015

3d-fyn work in progress shots

When I'm not finding UV mapping agonisingly quirky, I'm being frustrated by Blender's borderline unusable viewport lagginess at 2.2M polys.  There is some progress being made.  UV mapping was interesting as I couldn't figure out how to project onto part of a mesh like I've done previously in Lightwave so I ended up mapping the entire object om question.  For the shirt I just painted the whole thing and ued minimal nodes for colour and bump maps.  For the tattoos and face markings I stuffed around a hell of a lot with the skin shader and eventually got them on there but it now means I have blue freckles instead of dark brown.

3d-fyn showing uv mapped shirt and blue freckles (oops)