

October ProgBlog #2: contains an attempt at Blender 2.9 bake notes
posted on: Sunday, 11 October 2020 @ 11:35pm inA bit of unexpected chaos happened on Friday and it kind of wiped me out.
And then it was followed by a kind of busy weekend.
Which of course means being up kind of late Sunday night (right now) trying to bang out a progblog like people actually care about or even understand my delirious blender rambling XD
This week’s shenanigans involved trying to get the perfect bake once I figured out how to bake. I could not get the perfect bake and I suspect it’s either something to do with my cage mesh or blender is super aggressively caching something or some combination thereof. So in the interests of getting the hell on with it I managed to blunder my way to a good enough bake and hopefully I’ll figure it out down the line.

You can see the black bits on the tail and the glitchy bits on the innermost wing fingers that will need some smoothing out. The tail is done mostly by my laziness (I decided not to bother making sure the cage mesh covered it as all the tail texture was accidental anyway due to me being unable to get the tail smooth when sculpting). There’s also similar glithes on the hands and the geet and on parts of the head. I basically got to a stage where I was just trying to get rid of the glitches in the heavily detailed areas like the horns and any glitches in smaller areas I figured I would smudge over in straight texture paint (which I really hate) or figure out how to edit in bpainter (I did kind of figure it out but I couldn’t remember how I’d gotten it to just paint the normals before, it wanted me to colour pick all the way through last attempt where I probably did something wrong and that is a seriously uncomfortable way to work).
And after all my whining about having to do it, it was actually really easy. You’ll need one sculpt mesh/high poly model and one retopo mesh/low/er poly model. Ideally both should be nice and clean (especially the sculpt because trying to fix normal maps by painting is a right pain in the system so you want to minimise or eradicate repair work).
First up, make a uv map.

What do you mean how do you make a uv map? I’m definitely not good enough to give much advice past how to do it, make sensible sections using as few seams as possible, and try to put them in areas where they’re not going to get noticed too much as while you can usually paint over them you occasionally get some stubborn ones, and I’ve also somehow seem to have managed to bake some of the seams into some of the normal map attempts and still haven’t figured out how that happens (as I’ve also managed to do it in 3dC so it seems to be a weird baking thing rather than a weird blender thing).
Also avoid cylinders. Split things like arms and legs and tails (and necks if you section necks) so they roll out flat.
How:
- go to the
UV Editingtab in blender - in the right panel, make a new image in the image dropdown thing at the top. Name it something sensible and make it however big you like (I like 4096x4096) and tick the 32 bit float box. I like to use a colour grid
- hover over your object, press
L(to select all linked) - press
Uto bring up the uv menu (which is also available in the submenu thing on the left panel by default),- if you have a stupid complicated model like a character tick on the
Live Unwrapcheckbox and then onUnwrap - if you have a simple object, use the most appropriate projection method (they’re called things like box, cylinder and smart and end in projection). I suppose you could also try your luck with a more human shaped character, you might get lucky
- if you have a stupid complicated model like a character tick on the
- if you used one of the projection methods, you’ll hopefully have a nice uv map. If you didn’t, you should have one hell of a mess
- bolt on over to the
Shadingtab briefly- go to the
Materialspanel if it’s not already there - make a new material slot if there isn’t an existing one you can use
- make an
Image texturenode, select the uv map and plug it into the colour socket. Hopefully the colour grid (or the normal grid if you chose to use it) should now appear on the model. The idea is to try to get the grid squares to line up as neatly as possible
- go to the
- go back to the
UV Editingtab, press theuv syncbutton in the top left corner of the left panel (looks like two arrows pointing to opposite diagonals) - make seams by selecting edges, pressing
Uand thenMto mark seams orEto clear them. As you go you should start to see the map pieces separating out - I recommend doing this in mirror mode if you have a symmetrical object. If you aren’t using the mirror modifier (because like me you’re stupid and applied it before getting all the stuff requiring symmetry done) you can select stuff on the other side by using
shift+ctrl+Mand then ticking theExtendcheckbox on theMirror selectionpanel that should pop up (which will then make your selection which will originally mirror itself to the other side reappear as well as keeping the other side selected)

By the end of it you should have something kind of like this one (which is also an older version which is why it’s different from the one above which is the current one)

trying to avoid squishy/overly deformed grid as much as possible.
If you had an easy object or your complex object doesn’t have tight areas, bypass the next paragraph til we’re back in the Shading tab.
When everything seems reasonable, pop on over to the Layout or Modelling tab (it doesn’t really matter which, the former is easier to do the duplicate but you can just press Tab to switch in and out of edit mode if you don’t want to switch tabs), duplicate your object. We’re going to use this as a bake cage. The bake cage has to have the same number of vertices as the model (hence the duplicate) and the vertices may also have to somewhat line up (the worst glitches in the wing fingers were when I accidentally had autosmooth on when I was adjusting the cage in sculpt mode). Add a shrinkwrap modifier to the cage mesh and adjust the settings to be “above” and offset by a small amount. Then go to the Sculpting tab (or switch to sculpt mode I guess) and gently massage the cage so that it’s covering the sculpt mesh. I think you need to keep corresponding vertices as close together as possible but haven’t really tested this.
Some combination of manky uvs, wonky cages and unclean sculpts usually leads to glitches and hotspots such as

I still have a few I can’t figure out around the place but as they’re in less critical areas I’m going to be smudging them out either with the smudge tool in Texture Paint (ergh) or trying to figure out something with bpainter.
Hop on over to the Shading tab (hello again if you have a simple object), disconnect the image texture node from the colour node (I don’t actually know if you still need to do this with Blender 2.9, I did in 2.8 so just kept going), and make sure it’s selected. Then go to the Render Properties panel and scroll down til you find the Bake subpanel (which might be collapsed).
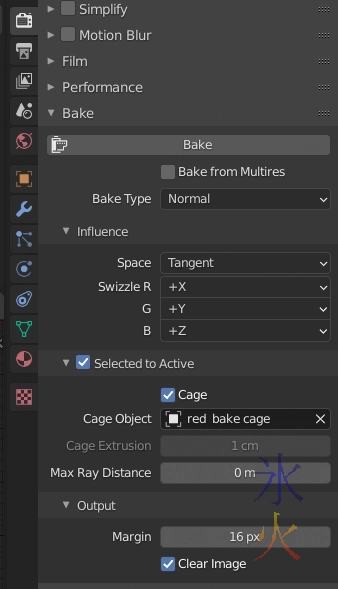
Select the bake type you want (it was Normal in my case), defaults should be fine, tick Selected to active, tick the box and select your cage object if using a cage or be prepared to possibly play with the numbers in the two boxes under it if you aren’t. Select the sculpt object, then shift or control select the retopo object (I use the outliner to select the models as mine were occupying the same space and said shift or control as it depends on whether there’s anything in between them or not). Then hit the big bake button.
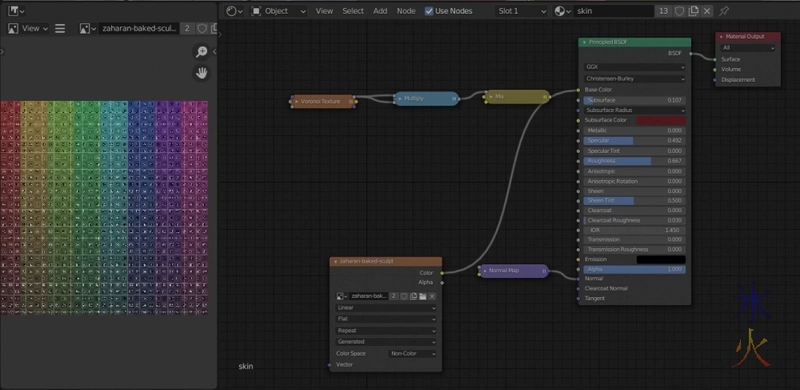
When the baking is done, you’ll need to add a Normal Map node to the node tree (assuming that you too were baking normal maps), plug the image texure node to it, and then plug that to the Normal socket of the principled bsdf node.

Also make sure your normal map is using a Non-colour colour space.
If you have a semi-decent one you can reuse it on other materials with different strengths like I did here to get the horn crest a bit stronger.

I’m currently trying to work out how to do the claws, might have to go watch bpainter tutorials again as I’m pretty sure there was a way to mask procedurals. After this is eyes and then hair and then rigging, then I’ll chuck some pants on him and jump back to Zara to see if I can’t fix her up properly, and then I’m definitely going to throw them into a scene together before moving on x_x
This work by ryivhnn is licensed under a Creative Commons Attribution-NonCommercial-NoDerivatives 4.0 International License